Monday, July 31, 2017

English on a Roll English Grammar Teaching Method Review


My family had the privilege of trying the English Grammar Teaching Method from English on a Roll for this review to use in conjunction with our own homeschool curriculum. This is a Homeschool Review Crew Review. All opinions expressed are my own or those of my family.

English on a Roll is a hands-on way to teach English grammar created by Linda Hopkins Koran. This is based on principles of Multi-sensory Structured Language (MSL). It concurrently engages the visual, auditory, and kinesthetic/tactile parts of the brain. It is color-coded and cube-based. This is a great teaching method to educate any age or level student about the proper use of English grammar and syntax, including all verb forms. Students can build unlimited phrases and sentences with the set. Recommended for teaching English language learners ages 5 to adult. Perfect for English as a Second Language (ESL), English for Speakers of Other Languages (ESOL), English Language Learner (ELL), English as a Foreign Language (EFL), beginning reading (K-4), literacy, speech therapy, special education, learners with Autism and/or Dyslexia, homeschooling, and adult literacy education.

The English Grammar Teaching Method is a starter set to teach English grammar for up to 6 students. It includes one instructors' manual and a cube set. The instructors' manual has 150 pages and 36 lessons. The cube set comes with 40 word cubes in a plastic case for storage. You can use this set with up to six students. You can get an idea of how they can be used in this video demonstration.

The instructors' manual is called English on a Roll: Book One. It is a soft bound book that contains 150 pages and 36 lesson plans, a teaching guide, games and conversation ideas, reproducible teaching materials and worksheets. This helps you teach with the cubes.

The instructors' manual starts out with a Cube Guide chart and About English on a Roll, then goes into the lessons with review at the end. The lesson pages each have a grey box at the top with Prep (what is needed for the lesson), Note, and Vocabulary for teaching the lesson. After the first grey box the lesson instructions start. There is another grey box with Teaching Notes and after that are Conversion/Games and Written Exercises. This is written for classroom use, but is adaptable for homeschooling. If you have purchased this you are also allowed to copy pages for multiple students from the manual for your use in your homeschool or classroom.

The cube set is a set of 40 cubes of which 38 are engraved upon. These word cubes are color coded with different colors being different parts of speech or word groups. Pronouns are blue, question words are green; nouns, articles, & prepositions are dark blue, verbs are red, adverbs are orange, adjectives are purple, punctuation & conjunctions are black. Also comes with two blank cubes to make your own with. It comes with 30 self adhesive labels to add vocabulary to the blank cubes. They also recommend using Avery 5/8″ x 7/8″ Self-Adhesive Removable Labels #05424 that you can purchase at any office supply store, or online if you get more blank cubes (these are also available to be purchased separately. These dice like cubes are made of solid plastic and are 1 inch (25mm) per side. These come in a durable plastic case that neatly stores all of them snugly so you know that you are not missing any.

With a few cubes you can make many sentences.

How We Used This and Our Thoughts: 
My family loves learning doing hands-on activities. We love science with labs, experiments, and projects; history with lap-books, cosplay, and role-playing; and math with its many manipulatives. But up until recently we hadn't found any hands-on approach to teaching and learning grammar and English. It is just one of a handful of subjects that I was unaware could be taught using a manipulative of some sort. I was pleasantly surprised to be introduced to the English on a Roll English Grammar Teaching Method

Initially I thought I could work through the material and lessons with my youngest, Zari, who is 6 years old and starting 1st grade this year, but on closer inspection I found that most concepts would be too advanced for her because she is only reading a handful of words. However; I did use the cubes with her for reading/sounding out the words on them and trying to make simple sentences with them. Some of the conversion/games in the instructors' manual also were less advanced and I included her in this instruction as well.

Teela playing with sentences.

My daughter Teela who is 9 and going into 4th grade came to the rescue to help me with this review. The lessons are right in line with what she is already learning in English and grammar. There is mostly grammar review and some new grammar for her that the book taught. I liked that the instruction could be with one to 6 people. That made it easier for both Zari and Teela to sit in on the lesson if needed and Teela could work on a photocopied page out of the book while Zari and I worked on her reading the cubes.

I liked how these cubes worked. You could change verb tense, punctuation, and many of the words just by flipping, replacing, and rearranging one cube or more. There are some words that are not on any of the cubes, but you can add them with the included labels and blank cubes. There are so many sentences you can build with these. My daughters liked making humorous sentences with these together.

I think these are a great manipulative and lesson set to teach English grammar. These are indispensable if you have a student that learns best hands-on. I highly recommend the English on a Roll English Grammar Teaching Method.

Follow Them on Social Media:
Website - http://www.englishonaroll.com
Facebook - https://www.facebook.com/englishonaroll
Hashtags - #hsreviews #EnglishonaRoll #grammar

BUY IT
You can purchase English on a Roll English Grammar Teaching Method for $75 and other options on their website. Order includes shipping if you buy directly from them with their "Order Form" by email, mail, or fax. Also, you only have to pay tax if you live in WA state. If you choose to "Buy Online" through Amazon please click the "More Buying Choices" and buy from English on a Roll directly. Just understand that you do not save on shipping unless you use their Order Form on their website.

Read other homeschool curriculum reviews for English on a Roll...
English on a Roll {Reviews}

Crew Disclaimer

Saturday, July 29, 2017

Cave Tools Grill Master's Barbecue Spatula With Bottle Opener Review


I received this product free to facilitate this review. Affiliate links may be in this posting. Thanks for supporting my blog.

Cave Tools Grill Master's Spatula is a great spatula to use when you are barbecuing and grilling. It is made from 20% thicker stainless steel than normal BBQ tool sets. It can flip and pick up large pieces of meat because it is so durable. Great for flipping burgers, chicken, steaks, etc. It has a serrated edge on the side for cutting food and hard to open packages of meat, contoured tip for easy flipping meat, an oversize face for large steaks or briskets, and a bottle opener so your grilling buddies stay hydrated. It is dishwasher safe for easy cleanup. For easy storage it has an extra wide hanging hook with leather strap to fit any grill tools holder. Perfect for tailgating and outdoor cookouts!

Cave Tools Grill Master's Barbecue Spatula can hang from any grill.

Comes with 25 professional cooking recipes with step by step instructions and detailed tutorial videos. Limited satisfaction guarantee. If at any point you are unhappy with your Cave Tools barbecue spatula you can return it for a full money back refund.

Cave Tools Grill Master's Barbecue Spatula has a serrated edge that can cut meat and hard to open packages.

Features:


  • Barbecue Spatula is Super Heavy Duty - Strongest most durable spatula will not bend or break when flipping large chunks of meat. 20% thicker stainless steel than normal BBQ tool sets.
  • Simple Storage - Extra wide hanging hook with leather strap fits on any grill including the Weber Genesis
  • Amazing for Tailgating and Backyard Cookouts - Bottle opener keeps your crew's thirst under control. Extra wide spatula with contoured tip so you can flip burgers all day long. Serrated Edge for cutting your meat and those hard to open packages.
  • Dishwasher Safe BBQ Spatula - Cleanup is so easy!


  • Cave Tools Grill Master's Barbecue Spatula has a convenient bottle opener.

    What We Thought:
    We love the Cave Tools Grill Master's Spatula! It is extremely sturdily built and can lift a small chicken or beef brisket with ease. I love that the handle is rounded so it fits in the palm nice and the way it feels when you flip with it. Since the tip is contoured it slides under the burgers for easier flipping. The wonderful serrated edge also opens bacon packages and other hard to open meats as well as slices through briskets and steaks. We love that it has a bottle opener too for our glass bottled root beers and ginger beers. The Cave Tools Grill Master's Barbecue Spatula looks like it will last a lifetime. We highly recommend it for all your grilling needs.

    BUY IT
    Purchase on Amazon at $12.98 and get free shipping with Prime or on Cave Tools for $11.99 + $5 shipping. Get the Spatula 15% Off with code: SPATULA15


    DISCLOSURE/DISCLAIMER: I received this product for free to facilitate this review. My thoughts are mine and my family's own opinion and have not been altered by anyone else. I did not receive any other compensation for doing this review. Affiliate links may be in this posting. Thanks for supporting my blog.

    Wednesday, July 26, 2017

    Wordless Wednesday Sunbrella

    Teela colored this umbrella at Activity Days this year.

    Nichole Nordeman Every Mile Mattered Album Review and Giveaway #everymilemattered #FlyBy

    I received this album free to facilitate this review. Affiliate links may be in this posting. Thanks for supporting my blog.

    Nichole Nordeman is a contemporary Christian singer and songwriter. Her singing career has won multiple GMA Dove Awards, including two awards for Female Vocalist of the Year.

    Nichole Nordeman just came out with "Every Mile Mattered", her brand new album that is going to be released July 28th. The theme of this CD is certainly a journey of life. Life changes us, hopefully for the better and with God at our side we will survive every change, bump, scrape, bruise, trial, and tribulation thrown at us. This album shows us this in song. The accompaniment on this album has a lot of beautiful piano and other instruments that enrich Nichole's lovely voice. The album comes with a CD insert that has the words of each song so you can follow and sing along.

    I love this whole album and have many favorites on this CD. The title track, Every Mile Mattered, which has a great chorus; Sound of Surviving because it is so uplifting, and Slow Down which I love because it is about watching your children grow up too fast and I can so totally relate.

    I can listen to this album over and over. It is so beautiful and emotional. It is moving, inspiring, and powerful. It surrounds you with so many great feelings. I highly recommend Every Mile Mattered!

    Track Listing:
    1. Every Mile Mattered
    2. You’re Here
    3. Dear Me
    4. No Longer
    5. Lean
    6. Hush, Hush
    7. Listen To Your Life
    8. Beautiful Day
    9. Sound of Surviving
    10. Anywhere We Are
    11. Slow Down (feat. Pepper Ingram)

    S O C I A L • C O R N E R
    Official website - http://nicholenordeman.com
    Facebook - https://www.facebook.com/nicholenordemanonline
    Twitter - https://twitter.com/nicholenordeman
    Instagram - https://instagram.com/nicholenordeman/
    VEVO - https://www.youtube.com/user/NicholeNordemanVEVO

    BUY IT


    ITunes
    Spotify
    Amazon

    Also she is coming out with a book in August called Slow Down. You can pre-order it now.

    WIN IT
    Prize: Win a copy of the Nichole Nordeman Every Mile Mattered Album {US ONLY}

    Only one entrant per mailing address, per giveaway. If you have won a prize from our sponsor Propeller / FlyBy Promotions in the last 30 days, you are not eligible to win. Or if you have won the same prize on another blog, you are not eligible to win it again. Winner is subject to eligibility verification.

    Please click on this post link if you do not see the script for Rafflecopter below. Also, if there is anything that is wrong with it let me know by emailing me: finamoon AT gmail DOT com I will try my best at fixing it. Thanks for being awesome readers!

    a Rafflecopter giveaway

    DISCLOSURE/DISCLAIMER: (in accordance with the FTC’s 16 CFR, Part 255: “Guides Concerning the Use of Endorsements and Testimonials in Advertising”): Many thanks to Propeller Consulting, LLC/Flyby Promotions for providing this prize for the giveaway. Choice of winners and opinions are 100% my own and NOT influenced by monetary compensation. I did receive a sample of the product in exchange for this review and post.

    Tuesday, July 25, 2017

    The Crafty Classroom Learn to R.E.A.D. Curriculum Notebook & R.E.A.D. Review Pack Review


    My family had the privilege of trying the Learn to R.E.A.D. Curriculum Notebook (36-week Curriculum) *and* R.E.A.D. Review Pack (28 Early Readers that Correspond with R.E.A.D. Notebook) from The Crafty Classroom for this review to use in conjunction with our own homeschool curriculum. This is a Homeschool Review Crew Review. All opinions expressed are my own or those of my family.

    The Crafty Classroom is a website full of homeschool resources and printables that are produced by homeschooling mother of 4 kids, Valerie Mcclintick. These are designed to make homeschooling easier. The Crafty Classroom produces high quality homeschooling curriculum and educational resources, like: alphabet, geography, science, math, Bible, reading, and writing resources.

    The Learn to R.E.A.D. Curriculum Notebook is a 4 day per week over 36 week curriculum that gives you everything needed to teach your child to read. R.E.A.D. is an acronym meaning: Ready, Eager, Able & Determined to READ! It comes as a downloadable and printable PDF eBook that has 785 pages filled with hands-on activities. This covers phonics, digraphs, blends, sight words, grammar, and writing. There are 30 word families, 64 sight words, and 24 blends & digraphs.

    The R.E.A.D. Review Pack is a 92 page downloadable and printable PDF eBook that has 28 Early Readers which correspond with the Learn to R.E.A.D. Curriculum Notebook. This can also be used as a stand-alone product, if you are not wanting a full curriculum. These cover 30 plus Word Families and 70 sight words. These are great to build fluency and be used as review. These early readers progressively build onto the learning as they go.

    How We Used This and Our Thoughts:
    I used this with my youngest daughter who is 6 years old. She is still just getting the hang of reading. I wanted to boost her confidence and try out The Crafty Classroom Learn to R.E.A.D. Curriculum Notebook & R.E.A.D. Review Pack. Zari was excited because she wants to read like her sister Teela who is 9 years old and devours books.

    I was disappointed though that my printer decided to act up for this review. Both of these files are large! The Learn to R.E.A.D. Curriculum Notebook is a full 785 pages long and the R.E.A.D. Review Pack is a full 92 pages. Printer ink is expensive and these pages have some that are supposed to be printed in full color as well. I just tried to print out as much as I could before my printer's ink ran out completely, but my pages didn't look at all as good as the pages in the PDF and all the printing really gave my printer a workout. It might be less expensive to have them printed out professionally so you don't eat up all your printer ink like I did.

    Just some of the pages of the Learn to R.E.A.D. Curriculum Notebook printed out with low ink.

    The Learn to R.E.A.D. Curriculum Notebook is very thorough and is a complete curriculum for teaching students to learn to read. It is perfect for homeschool applications for a kindergarten reading curriculum with phonics and word families. We worked on this 4 days per week. At the beginning of the PDF file there is a curriculum overview which tells you the week and which word family, sight words, and language arts your student was going to be working on in that week. There is also a general overview, daily schedule, and blends & digraphs week schedule to follow.

    The pages are placed inside a 3-ring binder. You are supposed to use two page protectors and a dry erase pen so that the pages can be reused. I didn't have any page protectors so I used a gallon sized zip lock bag. We also needed a composition book and a container or bag to hold the flash cards. We just used rubber bands to put the flashcards together.

    There are some pre-assessment activities that we were told to start out with. These are reviewing letters (both uppercase and lowercase) and their letter sounds. Zari did fairly well with this and knew all the letters, but some of the sounds she had forgotten. So we reviewed these until she had them down.

    You start out each day with a Daily Warmup. This consists of two pages that are placed in the page protectors and reused each day. This exercise has First & Last Name, Digital/Analog Time, Weather, Temperature, Count & Write Daily Number, Number Word, Ten Frame, Tally, Money, Days of Week, Months of Year, Number Word, and Number Line.


    Zari doing some of the work for the Learn to R.E.A.D. Curriculum Notebook.

    Each day there are different activities to teach the student reading skills. Each activity and page is explained really well in the PDF. These pages and activities Zari had the most fun with. She loved the hands-on games like Spinner Winner and BINGO. She also loved the cutting and pasting activities and the draw and write pages. There was so many fun things to do to help her learn to read in the Learn to R.E.A.D. Curriculum Notebook! She was really enjoying these lessons a lot.

    R.E.A.D. Review Pack, first 4 books.

    Along with the Learn to R.E.A.D. Curriculum Notebook we received the R.E.A.D. Review Pack. This has 28 simple to put together printable early readers that go very well with the curriculum notebook. Zari had fun reading these once she knew word family and sight words. These had fun graphics and an easy to read font. The little phonics readers are super cute. Since they are put together in pages of threes they are also simple to assemble. Just stack the three pages of each book in order of printing (first on top, last on bottom) and cut out the books pages along the dotted lines. Put the first stack on top of the next pages cut out and so on until all pages are in correct order (they are numbered just in case you get them mixed up), then staple together There are 4 books per a five week period. I printed the first 4 books to use with the curriculum notebook and weeks 1-5.  We used these 3 days per week. The instructions suggest an empty tissue box to store them in.

    Zari reading one of the R.E.A.D. Review Pack books.

    Zari is doing very well with this curriculum and I am very happy with it so far. It is just a lot to print out like I said. The activities keep her engaged and occupied learning. I highly recommend this curriculum and booklet pack for teaching Kindergartners that are beginning readers. It is perfect for a homeschool setting.

    Follow Them on Social Media:
    Website: https://craftyclassroom.com

    Facebook: https://www.facebook.com/The-Crafty-Classroom-121821161222656/
    Twitter: https://twitter.com/CraftyClassroom Tag: @CraftyClassroom
    Pinterest: https://www.pinterest.com/craftyclassroom Tag: @craftyclassroom
    Instagram: https://www.instagram.com/thecraftyclassroom Tag: @thecraftyclassroom
    Blog: http://thecraftyclassroom.com
    Hashtags: #hsreviews #CraftyClassroom #LearntoRead #HomeschoolCurriculum

    BUY IT
    The Learn to R.E.A.D. Curriculum Notebook is $25 and the R.E.A.D. Review Pack is $15.

    Read other homeschool curriculum reviews for The Crafty Classroom...

    Crafty Classroom {Reviews}

    Crew Disclaimer

    Monday, July 24, 2017

    ACTÍVA Products Rigid Wrap and CelluClay Quik-Sculpting Kit Review


    My family had the privilege of trying the Rigid Wrap and CelluClay Quik-Sculpting Kit and ACTÍVA Products' Favorite Sculpture KIDS CRAFTS (free e-book) from ACTÍVA Products for this review to use in conjunction with our own homeschool curriculum. This is a Homeschool Review Crew Review. All opinions expressed are my own or those of my family.

    ACTÍVA Products is a company has been around since 1959. They have quality wholesale arts & craft supplies to use at home or in the studio. These products are great for paper mache and sculpture, air dry clay, kiln fire clay, casting and mold making, colored sand and modeling sand, floral - supplies for flower drying and arranging, etc. They make many products including: Activ Clay - Air Dry Clay, La Doll Clay, Hearty Clay, Scenic Sand/Decor Sand - Colored Sand, Model 'N Mold Sculpting Sand, CelluClay, Permastone, BlackJack Clay - Stoneware Clay, InstaMold, ArtPlaster, Li-Qua-Che Paper Mache, Activ-Wire Mesh, Rigid Wrap Plaster Cloth, and Flower Drying Silica Gel, etc. These are great for homeschool for art and models for other subjects like: science and history. The ACTÍVA website has project instructions, craft tutorials, lesson plans, and videos to help you learn how to use the medium and get ideas for what can be done with it. These project ideas are aimed mostly for children with parental assistance, but the materials can be used by professional crafters and artists as well.

    Contents of the Quik-Sculpting Kit.

    The Rigid Wrap and CelluClay Quik-Sculpting Kit is a wonderful quick sculpting paper mache kit that contains Rigid Wrap plaster cloth, CelluClay, and instructions for 12 craft projects. This kit is especially great for Science Fair projects and kids crafts. Also this kit is fabulous for homeschool applications!

    The project kit includes:
    • 2 - 4" X 180" rolls of Rigid Wrap
    • 8 oz. of CelluClay
    • Complete instructions for 12 projects
    Rigid Wrap is a plaster coated gauze that you can use to make masks, jewelry, sculpture, home decor projects, and props. Just cut into strips, wet, lay and drape onto shape, smooth, layer, dry, finish, and decorate. This is non-toxic and can be quickly dried in the microwave.

    CelluClay is paper mache made with a virgin recycled paper medium that you mix with water to get the desired effect, a pulpy clay-like mixture that molds well. It air dries and is non-toxic and gluten free, and adheres to most surfaces without glue or paste. This is a very versatile substance. Once it dries it hardens and can be sanded, sawed, and nailed. You can then add more wet CelluClay to the dry stuff if needed. Once CelluClay is mixed with water it can be stored in a sealed plastic bag in the refrigerator for several days.
    The ACTÍVA Products' Favorite Sculpture KIDS CRAFTS is a full color digital eBook packed with fun project ideas to complete with ACTÍVA's sculpture products. In it you will find instructions for making the: Silly Spider, Bold Beads, Deadly Dinosaur, Beautiful Butterfly, Terrific Totem Pole, Piece of Cake, Egyptian Sarcophagus, Erupting Volcano, Mardi Gras Mask, Painted Pumpkin, Peppermint Candy Bowl, and Snowman Ornament. This is free to download for anyone that signs up for their emails and discount code on the ACTÍVA Products' website. You will get a link to download it from in your email inbox. No purchase is necessary.

    How We Used This and Our Thoughts:
    We received the ACTÍVA Products Rigid Wrap and CelluClay Quik-Sculpting Kit and were excited to use it because we love arts and crafts! This is the perfect kit to get when wanting to do plaster or paper mache sculpting. We found it super easy and fun to use.

    Poorly photocopied, cut off instructions.

    The box of stuff had two individually wrapped packages of Rigid Wrap and one bag of CelluClay. The box was leaking CelluClay dust out the side of it on closer inspection. After we opened it we saw that it came with poorly photocopied instructions and projects...some of which we could not completely read because they were cut off and in black and white. I am glad we also received the eBook because of this, but I wish all the projects from the box were in the eBook. There was a dragonfly, mummy, fish pinata, beach clock, and pencil toppers & bookmarks that were not included in the eBook that were in the box, but like I said I was having trouble reading the box projects.

    My daughters who are ages 6 and 9 did this art with me. They each made a Beautiful Butterfly with the Rigid Wrap from the box and ebook instructions. Then they made a design of their very own with the CelluClay. My daughter Teela made a dolphin and my daughter Zari made a rainbow.

    Zari and Teela making a butterfly with Rigid Wrap.

    Zari and Teela painting and decorating their Rigid Wrap butterfly.

    For the butterfly we cut out a cardboard shape out of the box the kit came in. For the second one we traced and duplicated this shape using a left over cereal box we had from our recycle bin. Then I cut a piece of the Rigid Wrap into short strips from the roll. The Rigid Wrap reminds me of old style cast material for broken bones. I had a bowl of warm water that the girls dipped one strip into at a time and applied it to their cardboard shape. They did this until it was at least two layers deep with no cardboard showing. They also built up the head and abdomen of the butterfly by scrunching pieces into a ball and shaping them for the body then covering them with more wrap to secure them into place. We dried in the microwave for 30 second increments and once dried they painted and embellished them with jewels, glitter, and fabric. Teela made her lay flat and Zari made hers more 3D.

    Zari and Teela making a rainbow & dolphin with CelluClay.

    Teela and Zari painting their CelluClay dolphin and rainbow.

    For the dolphin and rainbow shapes I had them draw an outline on cereal box and cut them out. Then we mixed up the CelluClay. I had a bit of trouble knowing the right consistency of the dry paper pulp & the water. The instructions that came in the box didn't say, so I looked on the ACTÍVA website and found a ratio in the Instructions, Tips and Technique Sheets under the Learn pull down menu on their website. Since this said it was only 8 oz of CelluClay on the box I first mixed it with 16 oz of water in a zip-lock bag, since the CelluCaly Technique PDF said to "Add 32oz if water to 1lb of CelluClay.", but that wasn't enough water and the pulp was still dry in spots. I added 16 more ounces and that seemed to be the right amount. The girls added mushy pulp to their cardboard armature, both front and back, engulfing it in the goo. Teela was saying it felt really weird and I think that Zari was enjoying working the stuff until it was how she wanted it on the frame. We let these projects dry overnight and they still were a bit damp the second day, so maybe a couple days drying time would be more appropriate. They painted and decorated these as well after they dried.

    They enjoyed this so much that we are going to make more projects later with the left over supplies. Yes! We have left over supplies to make even more projects. We are storing the CelluClay in the fridge until we do them because I made up the whole batch all at once. We highly recommend this kit for fun homeschool art and homeschool crafts as well as other projects for both summer time and for the school year.

    Follow Them on Social Media:
    Facebook: http://www.facebook.com/activaproductsinc Tag: @activaproductsinc
    Twitter: http://www.twitter.com/activaproducts Tag: @activaproducts
    Pinterest: http://www.pinterest.com/activaproducts Tag: @activaproducts
    Instagram: http://www.instagram.com/activaproducts Tag: @activaproducts
    Hashtags: #hsreviews #activaproject

    BUY IT
    You can purchase the ACTÍVA Products Rigid Wrap and CelluClay Quik-Sculpting Kit on their website for $11.90 or on Amazon.com for $8.80.


    Read other homeschool curriculum reviews for ACTÍVA Products Rigid Wrap and CelluClay Quik-Sculpting Kit...
    Rigid Wrap and CelluClay Quik-Sculpting Kit {ACTÍVA Products Reviews}

    Crew Disclaimer

    Thursday, July 20, 2017

    Save Everyday With Coupons From Groupon!


    Do you love to shop online? I do! It is so much more convenient, the prices are usually better because you can shop around, and you often find more variety. You don't have to fight with crowds, lines, long drives, or impulse shopping of things we really didn't need. It is nice to be able to buy things in the comfort of your own home...even in your pajamas.

    Groupon makes it even easier with coupons for 1000s of great deals at nearby restaurants, spas, things to do, shopping, travel and more. They have over 500 cities and over 9,000 national retailers listed in their coupon data bank with unbeatable deals for 50—70% off.

    Besides local bargains you can also save on goods, getaways, and online shops as well. Groupon Coupons is an entirely free and efficient way for shoppers to find thousands of coupons and exclusive promo codes from popular stores and companies. Shoppers can simply search by store to find the best deal for them.

    Groupon places I love to shop and save!

    I love getting deals on my frequently shopped at stores like Amazon.com, Target, and Walmart. I also love to get savings on home improvement and home decor from Home Depot and Bed Bath & Beyond. For my critters I love to shop and save at Petco and Tractor Supply.

    I love having Groupon right at my fingertips. I have saved so much on eating out, shopping locally/online, staying at hotels, going to the movies, and more! Groupon is a wonderful way to save!

    DISCLOSURE/DISCLAIMER: This post is a sponsored post. Thanks to Groupon for providing me this promotion information. My thoughts are mine and my family's own opinion and have not been altered by anyone else.

    Wednesday, July 19, 2017

    Doctor Aviation Review


    My family had the privilege of trying the six-month aviation course from Doctor Aviation for this review to use in conjunction with our own homeschool curriculum. This is a Homeschool Review Crew Review. All opinions expressed are my own or those of my family.

    Doctor Aviation is a wonderful online educational course that teaches about aviation. This is a 6 month online subscription. This course is made up of fifteen 45-60 minute video lessons with three segments (Technical Trivia, Notable Innovators, and Legendary Aircraft/Events). Each video lesson has two PDF files to download for further learning. These include: "To Learn More" which are suggestions that have extra readings, YouTube videos, movies, hands-on activities, research and writing assignments, etc. & "Guided Notes" to fill out as your student watches the video lessons to help them learn and retain the material. There are also Practice Exam Questions and Final Exam Study Notes to download. This course is recommended for ages 16 and up although it can be done with younger children and as a family course as well.

    If you are having your child take the course for credit for high school you would need to have them do enough of the suggested activities in the "To Learn More" PDFs to make it a half credit course. If you had them do most of the suggested activities it could possibly even be a full credit. You need them to also fill out all notes and do Exam 1&2 and the Final after studying. The Examination 1&2 and the Final needs to be obtained by contacting Doctor Aviation. Exam 1 is done after session 5 is completed. Exam 2 is done after session 11 is completed. The Final is done after session 15 is completed.

    Daryl Smith a.k.a. Doctor Aviation

    Daryl Smith a.k.a Doctor Aviation, the instructor and founder of the Doctor Aviation lessons, has logged over 2000 flying hours while in the Air Force  and 24 years of service as a Command Pilot. He was also an instructor pilot and research pilot during testing of the Strategic Defense Initiative (aka The Star Wars Program). On the ground he has served as an instructor at the United States Air Force Academy teaching aviation and other courses and a published author an aviation book. Currently he is a college professor. He is well qualified to teach the Doctor Aviation course.

    Doctor Aviation Video Course Overview

    Course Syllabus for Doctor Aviation:
    • Section 1 Course Intro.
      • Session 1: Course Overview: The Aviation System (42:29)
    • Section 2 The Aircraft: These include primarily airplanes, but also helicopters, gliders and balloon craft such as blimps and hot air balloons.
      • Session 2: The Major Components of an Airplane (53:41)
        Session 3: Axes & Forces (54:47)
        Session 4: Why an Aircraft Flies: The Secret of Airfoils and Lift (1:09:27)
        Session 5: Why an Aircraft Turns, Pitches and Slides: The Flight Controls (1:02:40)
    • Section 3 Air Traffic Control: The air traffic controllers, tower personnel and radars that  control the flow of air traffic. Think of them as traffic cops of the skies.
      • Session 6: How We See an Aircraft Miles Away: The Secrets of Radar (1:06:53)
        Session 7: The Air Traffic Cops: How Air Traffic Control Works (59:33)
    • Section 4: Aircraft Maintenance: Those individuals and equipment that repair or maintain aircraft.
      • Session 8: Keep 'Em Flying: Aircraft Maintenance - Propeller Engines (49:10)
        Session 9: Keep 'Em Flying: Aircraft Maintenance - Jet Engines (1:00:47)
    • Section 5: Airfield Operations: These tasks keep an airfield running; items like: De-icers, baggage handlers, ramp attendants, refueling trucks, ticket agents, etc.
      • Session 10: The City in and of Itself: Running a Large Airport (48:07)
        Session 11:The Small Airport and Running an FBO (57:47)
    • Section 6: The Aircraft II
      • Session 12: Flying in the Clear and Not so Clear Air: VMC & IMC (48:44)
        Session 13: Important Pilot Instruments - Altitude Indicator (53:34)
        Session 14: Important Pilot Instruments - Airspeed Indicator (43:44)
        Session 15: Other Aviation Ships: Gliders, Helicopters, Airships (1:00:18)

    How We Used This and Our Thoughts:
    My 16 year old teenage son, Delbin, and I started taking this course together. Delbin and I have had an interest in learning more about aviation and I thought that the Doctor Aviation Online Training Videos would be a great learning course for us to do this. I am glad to have the opportunity to try this in addition to my other homeschool lessons.

    Doctor Aviation Dashboard

    After we subscribed we could access the aviation video training course by logging in on the website. After logging in the dashboard shows our next lesson and by clicking on the "Watch This Lesson" in yellow we could go to video lesson page. The lesson page has the video to watch, "Action Steps" to take, and "Additional Resources" (the PDFs) to download.

    The "Guided Notes" are best done with the video programs they go with. So I would download and print them out ahead of time. While Delbin and I followed along we would fill these pages out as we watched. These pages are great to help retain all the the important information in these videos.

    Doctor Aviation Video Lesson Page

    We have been doing one lesson every two weeks so far because the extra work involved to get the high school credit for Delbin. The videos are very informative and interesting. The instructor's lectures are filmed in an airplane hanger and he uses props and graphics as well to explain his lessons better. Each video session has three parts: Technical Trivia, Notable Innovators, and Legendary Aircraft/Events. These parts go well together and with the section and session themes. The Technical Trivia is jam packed with the principles of aviation. In the Notable Innovators part we learned about the people behind aviation, like: The Wright Brothers, Chuck Yeager, Amelia Earhart, etc. In the Legendary Aircraft part we learned about famous aircraft and what makes them famous. In the Legendary Events part we learned about important things that happened to shape aviation history. It might take my son longer doing all of the activities in the "To Learn More" PDF so that he can get high school credit. I am glad there are 6 months to work on it.

    Some of the props and images/graphics used in the Doctor Aviation films.

    The "To Learn More" PDF has all sorts of neat books and articles to read, websites to go to, and videos to watch outside of the Doctor Aviation website. There is also a For Further Study section in it that suggests activities, like: field trips, detailed studies on more focused subjects, building models, doing research papers, hands-on activities, etc. Many of the links to websites are hyperlinks in the PDF making it easy to click on and go there. Some of the books and links are out of print or not working any more, however; because these were last updated in 2016. It would be really great if Doctor Aviation could update these more regularly.

    All in all Delbin and I have thoroughly enjoyed the Doctor Aviation course and can't wait to learn more in the coming months. I am glad to be able to take this course with him too because even as an adult I love experiencing and learning new things. Delbin will be glad to get a high school credit for this course as well. We highly recommend this for homeschool aviation education and high school credit. You could also apply this course to having your son receive a Boy Scout Aviation Merit Badge or just watch it yourself.

    Follow Them on Social Media:
    Facebook: https://www.facebook.com/doctoraviation Tag: @doctoraviation
    Twitter: https://twitter.com/draviationguy Tag: @draviationguy
    Hashtags: #hsreviews #Aviation #AviationHistory

    BUY IT
    Doctor Aviation is only $99 per half year.

    Read other homeschool curriculum reviews for Doctor Aviation...
    Aviation Course {Doctor Aviation Reviews}

    Crew Disclaimer

    Wordless Wednesday Pretty Rose

    Pretty rose in my garden.

    Tuesday, July 11, 2017

    The Instant Pot DUO is Amazon Prime's Deal of the Day!


    Affiliate links may be in this posting. Thanks for supporting my blog.

    Huge news! The Instant Pot Duo, 8 qt. is today's Amazon Prime's Deal of the Day!

    That means big savings on the Instant Pot!!! If you don't have one, today's the day to get one...

    A Few Notes About this Instant Pot and Why You Should Get It…
    1. It has an 8 qt. insert. This means it will hold more – It will easily cook a whole chicken, as well as larger cuts of meat and more beans, etc. 
    2. It is a DUO – This means it has High and Low pressure functions. 
    3. It combines 7 appliances in 1 – This means it has all the cooking functions you need: Pressure Cooker, Slow Cooker, Rice Cooker, Steamer, Sauté, Yogurt Marker and Warmer.
    4. Features 14 Smart Programs: Soup, Meat/Stew, Bean/Chili, Poultry, Sauté/Simmer, Rice, Multigrain, Porridge, Steam, Slow Cook, Keep Warm, Yogurt, Manual, and Pressure Cook. Cooking is as easy as pressing a button!
    5. Healthy! Stainless steel (18/8) inner cooking pot made from food grade 304 with no chemical coatings.
    6. Safe! Microprocessor monitors pressure, temperature, keeps time, and adjusts heating intensity and duration. UL and ULC certified with 10 safety mechanisms.
    7. Comes with accessories: stainless steel steam rack with handles, rice paddle, soup spoon, measuring cup, condensation collector and recipe booklet
    8. Makes yummy food. Traps the flavors, nutrients and aromas within the food and prepares healthy, tasty dishes.
    9. Supports busy lifestyles. Cooks your food 70% faster while you do other things.

    Read more about the specifics and order yours here! 

    You can also see more deals for Prime Day here!

    DISCLOSURE/DISCLAIMER: I wrote this post to let my readers know about this great opportunity and deal. I did not receive any compensation for posting this promotion. My thoughts are mine and my family's own opinion and have not been altered by anyone else. Affiliate links may be in this posting. Thanks for supporting my blog.

    Monday, July 10, 2017

    Home School in the Woods HISTORY Through the Ages Time Travelers American History Study: The Early 19th Century Review


    My family had the privilege of trying Home School in the Woods Time Traveler American History Study: The Early 19th Century for this review to use in conjunction with our own homeschool curriculum. This is a Homeschool Review Crew Review. All opinions expressed are my own or those of my family.

    Home School in the Woods is a family run business that creates Christian based history curriculum for homeschooling. This curriculum immerses your student in the topic. It is very hands-on with lapbooks, timelines, recipes, art, creative writing, notebook projects, dramatized audio theater, maps, crafts, projects, re-enactments, file-folder games, vocabulary to learn, etc.

    The Time Traveler American History Studies are a seven part series that starts with the New World Explorers and concludes at the end of World War II. These are recommended for grades 3-8. There are two different versions you can purchase, a CD version or a digital download version. With the CD version everything that you access and print is on the CD. With the digital download version you download a zipped file, place all of the contents into a folder on your computer, and access it by the start.htm file that is in that folder. We received the digital download version.

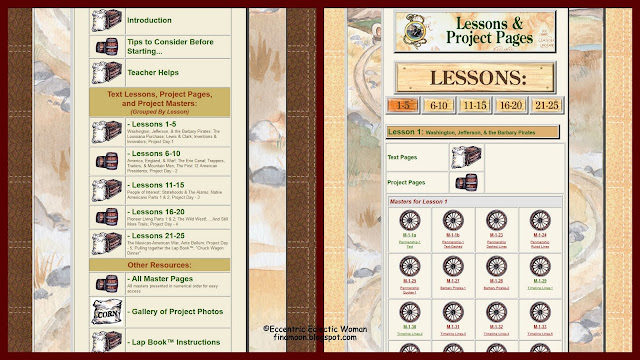
    Left: Main Menu, Right: Lesson Layout

    We found that there was a lot of preparation that needed to happen before getting started. There is a lot of things needing printed, items needing prepared for crafts and other projects, and general preparation of materials before one can begin the travel. The Beginning of the main menu includes: Acknowledgements / Copyrights and Usage / Bibliography, Introduction, Tips to Consider Before Starting..., and Teacher Helps which gives you a great foundation. Teacher Helps guides you with preparation and organization, gives you a Lesson Planner schedule to help you see an overview of the things being taught and Additional Resources to pull from. It also includes the printables for the 3-Ring Binder Covers and the Teacher Keys for the timeline.

    Each study has twenty-five lessons and is supposed to last roughly 5-10 weeks depending upon how quickly everything is completed. These lessons have reading Text Pages and an activity that go with them. Project Pages accompany these to give directions, list of supplies needed, printing instructions, and illustrations for each project and activity. Masters are provided for all printables.

    In the Other Resources section at the end of the main menu there are some visuals and directions to help you with the projects, activities, and lapbook. These include: All Master Pages in numerical order, A Gallery of Project Photos (final photos of what projects should look like at the end), and Lap Book Instructions. You can also have your student catch up with the five Project Days that are included in the schedule. The student will compile a lapbook in the 24th lesson. This lapbook is pieced together throughout the studies. The final lesson is a party with a theme that goes along with the series to celebrate the end of the study. These are very flexible and you can pick and choose what projects work best for your family.

    You will need a few items to get you through the lessons:
    • Working Printer
    • Color and Black Ink for the printer to cover all the printing that will be happening
    • White and Colored Printer Paper
    • White and Colored Cardstock (this is best, but admittedly we didn't have any of this and used only white printer paper and it worked OK)
    • One 3-Ring Binder for the Teacher's Binder (reading text, project direction pages, the "Guide-at-a-Glance," teacher keys, and any of the other teacher helps)
    • One 3-Ring Binder for the Scrapbook of Sights (student binder for all notebook projects including)
    • Colored File Folders or Colored Pocket Folders with Fasteners
    • Scissors and/or an X-acto Knife (when using an X-acto Knife you will need a thick piece of cardboard or self healing mat to use as a cutting surface)
    • Crayons, Markers, or Colored Pencils to color the pictures, if desired
    • Glue
    • Other Craft supplies specified for each of the different projects that your student wants to do
    Lessons for Time Travelers American History Study: The Early 19th Century:
    1. Washington, Jefferson, & the Barbary Pirates
    2. The Louisiana Purchase
    3. Lewis & Clark
    4. Inventions & Innovators
    5. PROJECT DAY - 1
    6. America, England, and War!
    7. The Erie Canal
    8. Trappers, Traders, & Mountain Men
    9. The First 12 American Presidents
    10. PROJECT DAY - 2
    11. People of Interest
    12. Statehoods & The Alamo
    13. Native Americans - Part 1
    14. Native Americans - Part 2
    15. PROJECT DAY - 3
    16. Pioneer Living - Part 1
    17. Pioneer Living - Part 2
    18. The Wild West!
    19. ...And Still More Trails
    20. PROJECT DAY - 4
    21. The Mexican-American War
    22. Ante Bellum
    23. PROJECT DAY - 5
    24. Pulling together the Lap Book™
    25. A Chuck Wagon Dinner!

    How We Used This and Our Thoughts:
    I enlisted my daughter Teela who is going into 4th grade this upcoming school year to learn about The Early 19th Century. She has loved doing Home School in the Woods Project Passports, Ancient Egypt and The Middle Ages study, in the past. This is supposed to be for 3rd through 8th graders so most of the projects she did very well on. She did need my help with some of the more advanced projects and writing assignments and it took her a lot longer to get through some of the written assignments than it might have taken for my older boys. I learned quite a bit too while helping her with this study.

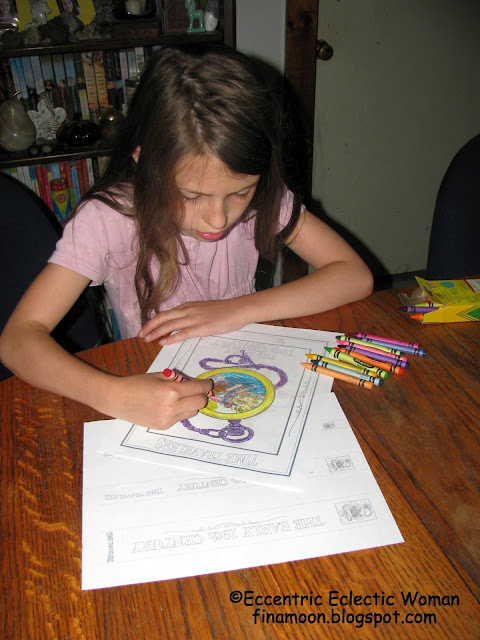
    Teela coloring the binder cover.

    This study was jam packed with information. This is all about early U.S. History. It is about the growth of this nation and the people that left their mark on it. In the weeks we had before this review we learned about Barbary Pirates, The Louisiana Purchase, the Lewis & Clark Expedition, and Inventions & Innovators of the time. There are creative writing, recipes and songs of the era, notebook timeline, factfile cards, file folder games, penmanship pages, notebooking activities, three-dimensional projects, arts and crafts, lapbooking, and a Chuck Wagon Dinner to bring the whole unit to a close. We still have not gotten through all the lessons, but we have enjoyed everything that we have done thus far.

    This was differently laid out than the Project Passports I was used to. There were no stops or pretending to be on a trip and these did not have any audio files to listen to. Like Project Passport though, the instructions are not hard, but there is a lot of things to set up and print out initially and throughout the program....so be aware of that and set some time aside to begin with to get things done so you are not overwhelmed.

    Pioneer Cooking Recipe: Jam Filled Cookies

    Teela really liked our project time together the most. She loves art and making things. She especially loved making the yummy Jam Filled Cookies from one of the Pioneer Cooking recipes. These turned out to be more like scones in my opinion. She also loved learning and singing the songs. We can't wait to make corn husk dolls, a faux coon skin hat, the woven wheat heart, and the other recipes. We are learning a lot and are enjoying every moment. These are so much fun!

    I highly recommend the Time Travelers American History Study: The Early 19th Century from Home School in the Woods. This is great for anyone homeschooling who might need some help with teaching The Early 19th Century in a highly educational, fun, and very hands-on way. This is a great stand-alone unit study or can be used to supplement something already being taught. This would also be perfect for those wanting something fun to do with their kids in the summer time. I am looking forward to reviewing more from Home School in the Woods in the future and learning more about United States history with this study!

    Follow Them on Social Media:
    Facebook: https://www.facebook.com/homeschoolinthewoods
    Twitter: https://twitter.com/HSintheWoods @HSintheWoods
    Pinterest: https://www.pinterest.com/hsinthewoods/
    Google +: https://plus.google.com/b/109711152019235885312/+Homeschoolinthewoods
    Hashtags: #hsreviews #history #unitstudies #AmericanHistory #lapbooking #HistoryUnitStudies
    #HomeschoolHistory #handson

    BUY IT
    You can purchase the download version of the HISTORY Through the Ages Time Travelers American History Study: The Early 19th Century for $27.95 and CD version for $28.95. Also, new this summer are A-La-Carte Projects, individual projects from their materials to purchase without having to buy the whole unit. Visit the for the A-La-Carte Projects above and receive a FREE Erie Canal project from Originally found in Time Travelers: The Early Nineteenth Century by adding the project from the list into your cart and then entering "alacarte" in the discount code bar at check out.

    The Review Crew also reviewed Activity-Paks, Lap-Paks, and the Timeline Trio. Read other homeschool curriculum reviews for Home School in the Woods...
    Hands-on History {Home School in the Woods Reviews}

    Crew Disclaimer

    Monday, July 3, 2017

    BubbleBum Booster Seat: New Stars & Stripes Design Review!


    I received this product free to facilitate this review. Affiliate links may be in this posting. Thanks for supporting my blog.

    The BubbleBum is a portable, lightweight, inflatable booster seat for children ages 4-11 (40-100 pounds). So easy to set up, it easily inflates by mouth within 20 seconds and deflates so that you may fold it easily into a backpack, suitcase, or purse. Weighing less than 1 pound it is lightweight and manageable. It also comes with a convenient tote bag to carry it around with and shoulder belt positioning clip so that your child's seat belt doesn't chafe or be too high. It is perfect for ‘3 across’ tight fits because it is only 13” wide. This makes it the perfect car seat booster for vacations, rental cars, taxis, plane flights, car pools, play dates, and care givers.

    Award-winning BubbleBum meets and exceeds all European and U.S. safety regulations and is rated the 'Best Bet' Booster by the Insurance Institute for Highway Safety (IIHS) 6 years in a row. The material used to make the BubbleBum is similar to that of a lifebelt making it durable and extra safe. The air bladder is made from memory foam which adds structural integrity and comfort.

    Includes: Bubble Bum booster seat, shoulder belt positioning clip, instructions/registration card, 1 free mobile games app, & bag.

    Features:
    • For children ages 4 - 11, 40 - 100 pounds
    • Inflatable - easily inflates by mouth within 20 seconds
    • Deflatable, foldable and portable - great for travel, vacations, rental cars, taxis, plane flights, car pools, play dates, and care givers
    • Easily fit three car seats across the back seat with BubbleBum because it's 13" Wide
    • Lightweight - weighs less than 1 pound
    • Meets and exceeds all European and U.S. safety regulations
    • Rated a "Best Bet" Booster by the Insurance Institute for Highway Safety (IIHS), Winner of many awards including the National Parenting Center of Approval
    • When deflated, it easily fits in a purse or backpack
    • Fun designs

    Installation: inflate through valve, attach shoulder belt positioning clip and place behind shoulder of child, place belt through both red side clips, & buckle child in.

    Our Thoughts:
    We love the BubbleBum! It is easy to install and super convenient to take on trips. We plan on bringing it when we all go to Ohio in the fall as a family. We love how easy it is to grab and go and it is super affordable! For the safety and peace of mind of always having a car seat for my younger children, the BubbleBum is the perfect solution!

    Zari siting in our van on the BubbleBum Booster Seat. Notice the shoulder belt positioning clip.

    The Stars & Stripes design is so patriotic and a great way to show off your love of the United States of America. This design is especially wonderful for showing some Red, White, and Blue during Memorial Day, the 4th of July, or Veterans Day! BubbleBum also comes in Pink Chevron, Black, Union Jack, and Irish Shamrock.

    BUY IT


    DISCLOSURE/DISCLAIMER: I received this product for free to facilitate this review. My thoughts are mine and my family's own opinion and have not been altered by anyone else. I did not receive any other compensation for doing this review. Affiliate links may be in this posting. Thanks for supporting my blog.